The following information is made available to you to assist in your use of Google Sites and Google Drive.
One of the most confusing parts about using Google is making sure you are logging in using the correct account. Since so many of us have personal Google accounts and web browsers like Chrome assist in automatically logging into Google services, it is very easy to be logged into the wrong account. The second section of this document will walk you through a method to switch the account you are using to your University of Missouri account (userid@umsystem.edu).
Another confusing aspect of using any cloud-based file storage is setting up rights correctly so that people you want to be able to view or download a file can do so. The last section of this document will walk you through how to share a file from Google Drive so that anonymous visitors to your website can open the file without needing specific rights.
Finally, Google has very good help available about all of their services. We suggest you pay particular attention to those topics pertaining to Google Sites and Google Drive to make your experience as seamless as possible.
Quick Reference
Log into Google Using a University Account
Switch Accounts
Google has many options for making it easy to switch between accounts you may own, including University of Missouri accounts. To utilize the Google Apps for Education products the University provides to every account, you must make sure you log into the University account.
Many people who have personal Google accounts sometimes set up their browsers to automatically use their personal account. This causes issues where they are expecting to see University Google apps since they are not logged into their university account.
Check which account you are using:
- In your browser, navigate to Google
- In the upper right-hand corner of the browser window, click on the user account avatar to open the drop-down menu:
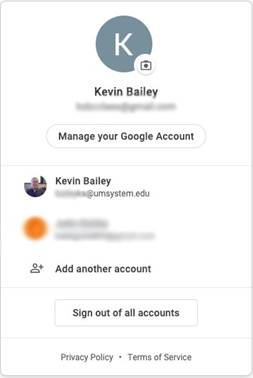
As the above image shows, this user is logged into their personal account but has added his University of Missouri account as another account using the Add another account feature of Google. In this case, the user just needs to select his @umsystem.edu account and possibly enter the password for that account to switch.
- If there are no other accounts set up in the Google account switching menu, just click Sign out of all accounts and then sign into the University of Missouri account.
Create a new Google account for your UM System email
- Go to google.com
- Select the Sign in button
- Enter your @umsystem.edu email address
- Select the Next button
- When the university login appears, enter your @umsystem.edu email again and select Next again:
- Enter your university password (the same password you use for HR and logging into your computer)
- Select Sign in.
- Login will require double authentication. This could be a text to your phone, or some other way of verifying your identity. Select Verify, or “Sign in another way”.
- Once login is complete, navigate to Google Drive.
- From Drive, on the left side, select “Shared with me”.
- All files currently shared with you will then be available in the central part of the screen. Double click on a file or folder to open it.
Quick Reference
Sharing a file from Google Drive
Background
When you want to share a file from your Google Sites website, you can add a link to the file from any place that gives you a URL to reference the file. For simplicity, it is easiest to store files you want to share from Google Sites in your UM System Google Drive account. However, you must ensure you share files correctly from Google Drive so that visitors to your website do not get messages about not having access privileges. If you start receiving emails requesting access to a file you shared from Google Drive on tour website, you have not shared the file so that anonymous users can view it.
Share a file
- Open a folder in your UM System Google Drive and upload a file into it.
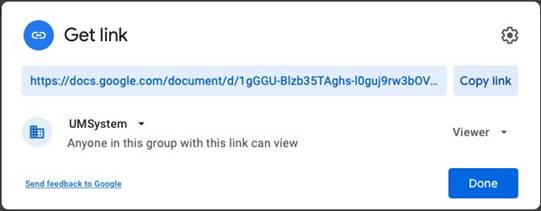
- Click once on the file name and choose the link button in the toolbar:
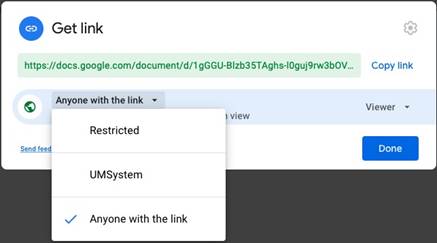
- The link settings window will be displayed:
- Change the link type to be “Anyone with the link”
- Click Copy link to copy the link to your clipboard and then click Done.
- Go to your website and create a link on a page using the link you just copied to your clipboard.